How To Remove A Chair Rail : How To Install A Chair Rail Molding Diy Family Handyman / Then, hit it with a rubber mallet until it's inserted correctly in the chair rail.. You can use either the bottom or top of the chair rail. The chair itself is bulky and has significant weight, so be careful. Wainscoting or bead board would be a beautiful look. The dip in the middle does not matter (nor do the nail holes) as the joint compound will take care of that, it's all about making the surface uniformly flat. Usually, it's placed in dining rooms that have many chairs in the dining set.
Need info on how to remove chair from track assy. But since it adds a nice touch to the wall, the chair rail become the addition to give pleasing visual and architectural interest to the room. Removing the chair rails from the walls use a utility knife to score along the edges of the trim. This was definitely a learning project….which means it took a few unexpected turns. Remove it if you're wanting to go less formal.
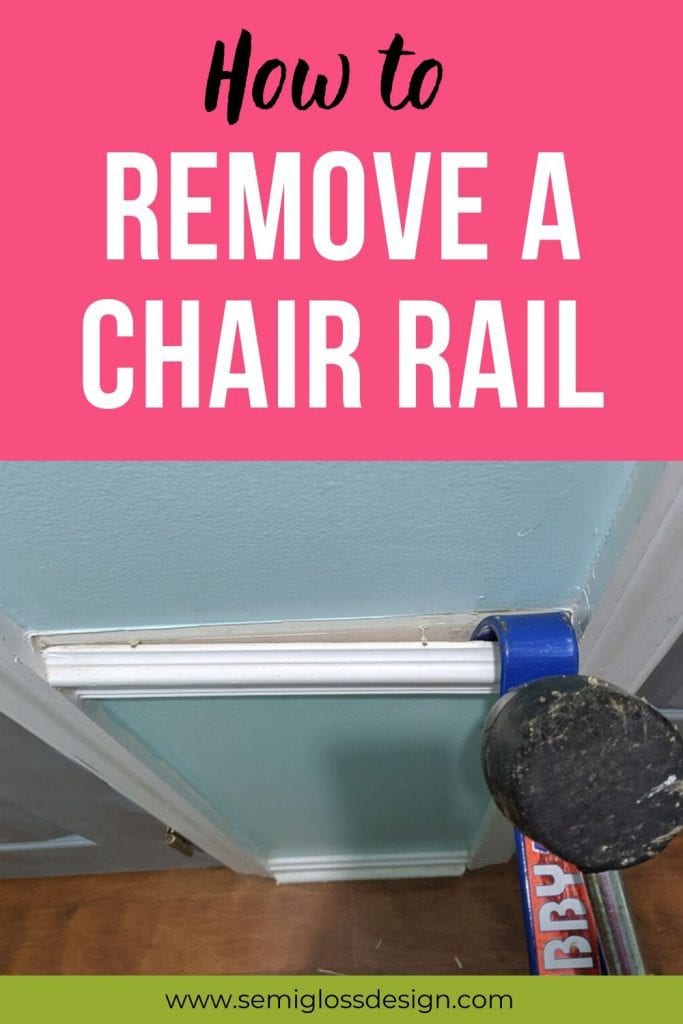
How To Remove A Chair Rail And Repair The Walls For Paint from www.semiglossdesign.com Get shopping advice from experts, friends and the community! 1.2.3 installing the rail 1. After cutting along the trim, insert the pry bar's edge into the wood trim. If you didn't use the putty knife and just started to pry it off you would leave more dents or even holes in the wall from the screwdriver. Use a utility knife to score along the edges of the trim. Let it dry over night. Unfortunately, when i starting pulling the chair rail, i found out that it was glued to the painted wall. The dip in the middle does not matter (nor do the nail holes) as the joint compound will take care of that, it's all about making the surface uniformly flat.
Pulling it loose also pulled the paint and exposed the drywall paper.
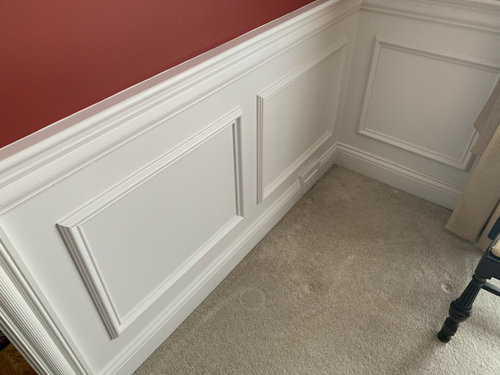
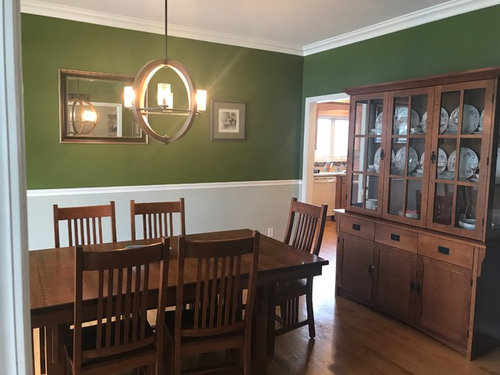
Cut through the caulk by running the edge of the pry bar along the seam where the chair rail meets the wall. Removing glued chair rail, what do? Slide the wide putty knife flat against the wall, starting at one end of the chair rail. Consider complete panelling below the chair rail: Slide the thin edge of the pry bar into the gap, using the putty knife as a shield to protect the wall. Grip the putty knife firmly by its handle and stick it in the space you were able to create between the trim and the wall and/or between the other trims. You may need to work along the wall at first before you find a place where the knife will fit. Usually, it's placed in dining rooms that have many chairs in the dining set. Position the rail as one complete assembly on the staircase, with the lower (angled) end resting on the floor, at the bottom of the stairs and the steel toothed rack uppermost. Removing the chair rails from the walls use a utility knife to score along the edges of the trim. Use drywall patching compound to fill in nail holes and rough edges level with the wall. Removing the chair rails from the walls demo is the fun part. I've often just had the chair rail the same color as the wall instead of painting it the trim color.
This will further open a gap between the chair rail and the wall, making removal of the whole thing easier. When i last showed you my living room makeover, i think the picture below is about what the room looked like. Place the rail end on the bottom of the rail. The dip in the middle does not matter (nor do the nail holes) as the joint compound will take care of that, it's all about making the surface uniformly flat. I decided to paint my kitchen, and while i was at it take down a chair rail.
Is This Chair Rail Wainscoting Outdated from st.hzcdn.com Then, slowly pull the pry bar and the trim from the wall. 1.2.3 installing the rail 1. Remove your tape and enjoy your new chair rail free walls. I've reached out to some local painters and they are saying that this is a orange peel textured wall when they look at pictures. After cutting along the trim, insert the pry bar's edge into the wood trim. Cut through the caulk by running the edge of the pry bar along the seam where the chair rail meets the wall. When autocomplete results are available use up and down arrows to review and enter to select. Insert the edge of the pry bar beneath the wood trim and hit it with a rubber mallet a few times until it goes under the wood more.
You can use either the bottom or top of the chair rail.
Then using a sturdy putty knife get in behind the chair rail, and then using a screwdriver or, anything else to pry it off, put the screwdriver on the putty knife using that as a block. Originally, a chair rail was used to protest the wall from the damage that is made by the chair. I've reached out to some local painters and they are saying that this is a orange peel textured wall when they look at pictures. Grip the putty knife firmly by its handle and stick it in the space you were able to create between the trim and the wall and/or between the other trims. At this point, leave the rails attached to the chair frame, because it is easier to insert your new sling into a rail that is held firmly in place. Removing glued chair rail, what do? Touch device users, explore by touch or with swipe gestures. Place the rail end on the bottom of the rail. I wanted to give you an update as well as give you some advice if you are figuring out how to remove chair rail. Insert the edge of the pry bar beneath the wood trim and hit it with a rubber mallet a few times until it goes under the wood more. Slide the wide putty knife flat against the wall, starting at one end of the chair rail. Cut through the caulk by running the edge of the pry bar along the seam where the chair rail meets the wall. Press the knife between the trim and the wall.
This cuts the caulk and prevents the walls from getting torn up. Place the tip of the pry bar on the. Let me show you a side by side comparison of the first attempt in our living room to this attempt. This was definitely a learning project….which means it took a few unexpected turns. The track is made of aluminum and will definitely need two people to carry it.
Dining Room Paint Chair Rail from st.hzcdn.com Pulling it loose also pulled the paint and exposed the drywall paper. Use drywall patching compound to fill in nail holes and rough edges level with the wall. Place the rail end on the bottom of the rail. 2 hold the pry bar perpendicular to the chair rail. When you have a chair rail, it can be hard to figure out whether to use the same paint colour on the upper and lower portion of. Consider complete panelling below the chair rail: Press the knife between the trim and the wall. Boy do i have advice!
Then, slowly pull the pry bar and the trim from the wall.
Use drywall patching compound to fill in nail holes and rough edges level with the wall. Now, i'm not going to lie and tell you i can't see the chair rail at all or that this is a perfect solution. Insert the edge of the pry bar beneath the wood trim and hit it with a rubber mallet a few times until it goes under the wood more. How to remove a chair rail cut along the edges of the chair rail between the trim piece and the wall using a utility knife. The chair rail is weak. Remove it if you're wanting to go less formal. You can use either the bottom or top of the chair rail. The chair itself is bulky and has significant weight, so be careful. Grip the putty knife firmly by its handle and stick it in the space you were able to create between the trim and the wall and/or between the other trims. We recently removed a chair rail in a house that we purchased and started to patch holes and wall imperfections before i got worried that we weren't qualified to fix the wall. There are several options for removal once a stairlift is no longer required. Remove your tape and enjoy your new chair rail free walls. Next day use a damp sponge over the patch to smooth it out.